hexo博客配置 all in one

本文最后更新于:2024年5月18日 晚上

本文记录了我基于hexo构建的博客的一些配置

博客迁移、多设备写作

安装 hexo

1
2
3
4
5
brew install git

brew install node

npm install -g hexo-cli
  • 下载nodejs
    • 建议使用scoop下载
  • 使用npm下载hexo
    • npm install -g hexo-cli

命令行进入到C:\hexo目录

1
2
hexo n ""
hexo d -g

压缩包

直接复制粘贴会破坏修改日期,导致博客文章乱序,把整个文件夹打成压缩包可以避免修改日期的变化

步骤:将原先电脑的hexo文件夹打成压缩包,然后复制到新电脑,解压(比如C:\hexo目录)

这里不直接复制的原因是,会改变博客文件的最近修改时间,从而导致顺序混乱

编辑器

typora


title: hexo博客配置
tags: [hexo]
typora-root-url: ../
abbrlink: 19ab6481
index_img: /image/hexo.jpeg
categories:


1
2
3
4
5
6
7
8
9
10
11
12
13
14
15
16
17
18
19
20
21
22
23
24
25
26
27
28
29
30
31
32
33
34
35
36
37
38
39
40
41
42
43
44
45
46
47
48
49
50
51
52
53
54
55
56
57
58
59
60
61
62
63
64
65
- 设置picgo上传图片

obsidian
- 配置主题(默认主题实在是太丑了)
- 推荐minimal和Blue Topaz
- 搭配style setting插件可以定制一下主题
- 配置图片路径
- 设置-》新建笔记的存放位置-》当前文件所在的文件夹
- 设置-》核心插件-》打开工作区、斜杠命令
- open 已存在的文件夹(也即是_post文件夹),如果打开的是hexo根文件夹那么图片无法正常显示
- 模板功能:在_post文件夹下新建一个template文件夹,创建文件并在其中写入你想快速插入的内容,这样在新建文件之后可以快速生成模板内容,从而避免命令行运行hexo n “title”命令

我的ob的效果:
![](https://img.gls.show/img/20230810160851.png)

# 评论功能

可以使用多种插件支持博客评论功能,比如:
- [Valine (opens new window)](https://valine.js.org/configuration.html):基于 LeanCloud
- [Waline (opens new window)](https://waline.js.org/): 从 Valine 衍生而来,额外增加了服务端和多种功能
- [Gitalk (opens new window)](https://github.com/gitalk/gitalk): 基于 GitHub Issues
- [Utterances (opens new window)](https://utteranc.es/): 基于 GitHub Issues

我选择了utterances~~因为比较简单~~

## 部署步骤

1.安装utterances
安装页面:[GitHub Apps - utterances · GitHub](https://github.com/apps/utterances),选择你的github仓库即可

2.更改fluid配置

[配置指南 | Hexo Fluid 用户手册](https://hexo.fluid-dev.com/docs/guide/#%E5%8D%9A%E5%AE%A2%E6%A0%87%E9%A2%98)

```yaml
# 评论插件
# Comment plugin
comments:
enable: true # change into true
# 指定的插件,需要同时设置对应插件的必要参数
# The specified plugin needs to set the necessary parameters at the same time
# Options: utterances | disqus | gitalk | valine | waline | changyan | livere | remark42 | twikoo | cusdis
type: utterances


#---------------------------
# 评论插件
# Comment plugins
#
# 开启评论需要先设置上方 `post: comments: enable: true`,然后根据 `type` 设置下方对应的评论插件参数
# Enable comments need to be set `post: comments: enable: true`, then set the corresponding comment plugin parameters below according to `type`
#---------------------------

# Utterances
# 基于 GitHub Issues
# Based on GitHub Issues
# See: https://utteranc.es
utterances:
repo: LaPhilosophie/gls.show # add repo info
issue_term: pathname
label: utterances
theme: github-light
theme_dark: github-dark
crossorigin: anonymous

图片外链

给博客生成图片外链是一个比较头疼的事情,一般的常规做法是部署一个图床服务,把图片上床到图床,然后将图片链接复制到博客中

比如:

  • 使用七牛云+picgo的组合
  • 使用lychee等图床部署在自己的服务器上,生成外链

但是一旦迁移服务器或者更换域名,外链都会挂掉

我的个人配置是,在每个md文件开头写上:

1
2
3
typora-root-url: ../

index_img: /image/wdnmd.jpg

这样就可以使用上一个目录的文件夹/image下的wdnmd.jpg的图片

2023-6-13图片外链更新:

使用腾讯云对象存储+PicGo+typora

  • 腾讯云:配置cdn、ssl、证书、域名、存储桶等,按照腾讯云官网的文档即可(这个证书认证和cdn还是比较蛋疼的)
  • PicGo:安装并配置客户端
  • typora:插入图片时上传图片

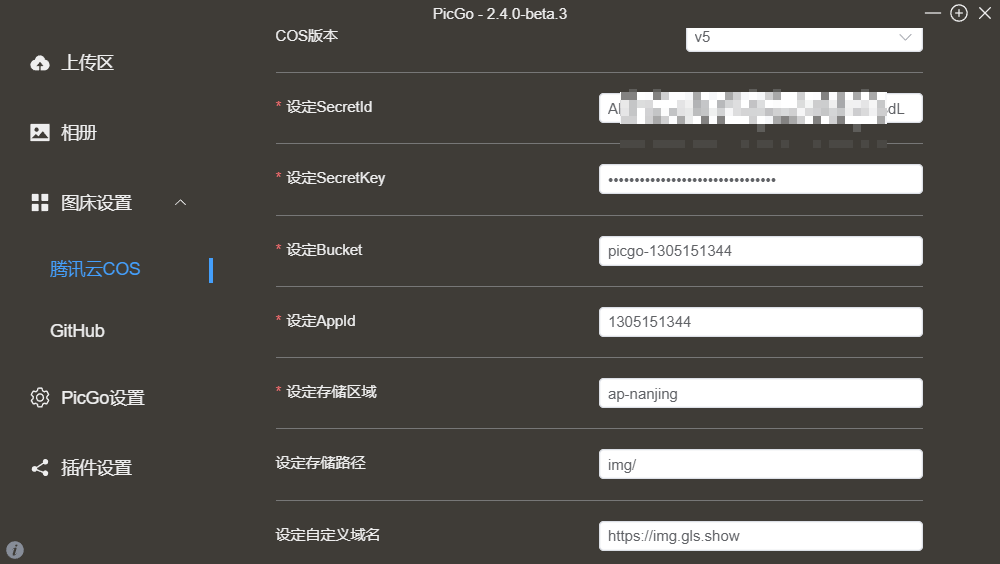
相关的id和key信息可以在控制台看到:

文章外链优化

hexo默认的文章链接是域名/年/月/日,复制之后由于汉字转义会有很长的乱码出现,不利于阅读

可以使用插件解决

修改_config.yml

1
2
3
4
5
permalink: p/:abbrlink/

abbrlink:
alg: crc32 #算法: crc16(default) and crc32
rep: hex #进制: dec(default) and hex

优化后的博客链接:https://gls.show/p/f9220a0b/

配置网站ssl

腾讯云控制台-》申请免费证书-》我的证书-》下载-》选择nginx-》将gls.show.key和gls.show_bundle.crt文件通过scp或者filezilla复制到/etc/nginx目录下-》sudo nginx -s reload或者sudo service nginx restart

seo优化

生成sitemap

1
2
npm install hexo-generator-sitemap --save
npm install hexo-generator-baidu-sitemap --save

将博客同时推送到两个git

可参考官方手册:https://hexo.io/docs/one-command-deployment

You can use multiple deployers. Hexo will execute each deployer in order.

1
2
3
4
5
6
- type: git
repository : git@gls.show:xx/hexo.git
branch: master
- type: git
repository : git@github.com:LaPhilosophie/blog.git
branch: master

发表博客

新建博客

1
hexo n "My New Post"

本地测试

1
hexo s

创建静态页面

1
hexo g

部署页面

1
hexo d

设置文章属性

是否可见:

1
hide: false/true

设置置顶:
可以在文章开头 Front-matter (opens new window)中配置 sticky 属性。sticky 数值越大,该文章越靠前,达到类似于置顶的效果,其他未设置的文章依然按默认排序

1
sticky: 100

免密部署

wdnmd.pub放在git用户的.ssh文件夹下的authorized_keys中

本地:

1
2
3
eval $(ssh-agent)

ssh-add ~/.ssh/wdnmd

emoji

  • 想要在博客中插入emoji,可以使用网站https://emoji.muan.co/

    • 该网站已被墙😅
  • 曾尝试过Markdown自带的emoji,在你本地的md文件中是可以看到的,但是在网页中无法显示

emoji.muan.co 效果测试:

🚠🚅✈️🚒

增加网页js

比如增加动态彩带效果:

在_config.fluid中添加

1
<script src="/js/caidai.js"></script>

Hexo\source\js文件夹中增加caidai.js文件,写入网址中内容

使用 vscode 写Markdown

  • 安装插件:Markdown image 、Markdown preview
  • 更改图片目录为../image
  • 在hexo/source目录打开vscode,不可以在_post目录打开vscode,否则无法显示图片

写文章原则

踩到的坑

  • 报错:fatal: not a git repository (or any of the parent directories): .git。解决方案:删除hexo目录下的.deploy_git文件夹
  • md文件开头的几个选项,比如tags:后面要留一个空格才可以正确解析,不然会导致无法部署
  • 出现如下报错:
    1
    2
    3
    4
    5
    6
    7
    8
    9
    10
    11
    12
    13
    14
    15
    kex_exchange_identification: Connection closed by remote host
    Connection closed by 20.205.243.166 port 22
    fatal: Could not read from remote repository.
    Please make sure you have the correct access rights
    and the repository exists.

    FATAL {
    err: Error: Spawn failed
    at ChildProcess.<anonymous> (C:\Hexo\node_modules\hexo-util\lib\spawn.js:51:21)
    at ChildProcess.emit (node:events:390:28)
    at ChildProcess.cp.emit (C:\Hexo\node_modules\cross-spawn\lib\enoent.js:34:29)
    at Process.ChildProcess._handle.onexit (node:internal/child_process:290:12) {
    code: 128
    }
    } Something's wrong. Maybe you can find the solution here: %s https://hexo.io/docs/troubleshooting.html
    • 解决:在~/.ssh/config中如下配置:
      1
      2
      3
      4
      Host github.com
      Hostname ssh.github.com
      IdentityFile "C:\Users\GuoJiaming\.ssh\wdnmd"
      Port 443

      导航栏颜色

navbar_bg_color: “#153b6e”

博客留言板

//todo

一些参考

https://bbs.huaweicloud.com/blogs/226867
https://emoryhuang.cn/blog/1729600336.html


hexo博客配置 all in one
http://gls.show/p/19ab6481/
作者
郭佳明
发布于
2023年10月16日
许可协议