SEED-lab:Buffer-Overflow Attack Lab (16.04虚拟机)
本文最后更新于:2025年6月25日 上午
Environment Setup
Linux有两个防御机制:
- /bin/sh符号链接指向的是/bin/dash,dash和bash都有防御机制,当它们发现自己是在setuid进程中被执行的时候,就会euid为进程的真实用户id,放弃特权
- 地址空间随机化:Linux 使用地址空间随机化来随机化堆和堆栈的起始地址
为了正常进行实验,需要:
- 关闭地址空间随机化
- 将/bin/sh符号链接指向没有保护的shell,比如zsh
1 | |
shellcode:
- shellcode本质是启动shell的代码,一般是二进制形式
- 需要被装载到内存中从而可以使得恶意程序跳转到shellcode代码所在位置
C语言版本的shellcode:
1 | |
上述程序对应的二进制形式被写在了code数组中:
1 | |
这里解释一下 ((void(*)( ))buf)( );
对于这种复杂指针问题,我们祭出小学五年级学过的右左法则:
- 先看最里面的括号,再看右边,再看左边
- 每当你遇到括号,你应该改变你的阅读方向
- 解析完括号内的所有内容后,跳出括号
- 重复此过程,直到解决整个语句
Right-Left Rule: First look at the innermost parenthesis, then look to the right, and then to the left. Whenever you encounter parentheses, you should switch your reading direction. Once you have parsed everything inside the parentheses, jump out of the parentheses. Repeat this process until the entire statement is resolved.
reference:https://blog.karatos.in/a?ID=00250-f7e0610c-459c-431a-a3ab-d9a50a7d5598
因此最里面的内容可以提取为:void(*)( ),也即是void(* foo)( )
foo一个指向函数的指针,返回值是void类型
之后向外看,buf被强转为上面的指针类型,这里进行了调用,也即是执行了二进制代码
再解释一下为什么将“//sh”而不是“/sh”推入堆栈。这是因为我们需要32 bit,而“/sh”只有24位,要注意到“//”等效于“/”,不信你可以试试在命令行敲入/bin//sh也是可以开启shell进程的
使用call_shellcode.c得到root shell:
1 | |
The Vulnerable Program
1 | |
攻击面:
该程序从一个名为 badfile 的文件中读取一个输入,然后将该输入传递给函数 bof ()中的另一个缓冲区。原始输入的最大长度可以是517字节,但是 bof ()中的缓冲区只有 BUF SIZE 字节,也即是24长,小于517。因为 strcpy ()不检查边界,所以会发生缓冲区溢出。由于这个程序是一个 root 用户拥有的 Set-UID 程序,如果普通用户可以利用这个缓冲区溢出漏洞,那么用户可能会得到一个 root shell。应该注意的是,程序从一个名为 badfile 的文件中获取输入。此文件由用户控制。现在,我们的目标是为 badfile 创建内容,这样当易受攻击的程序将内容复制到其缓冲区时,就可以产生一个root shell。
编译:
首先将程序的所有权更改为 root
然后将权限更改为4755以启用 Set-UID
更改所有权必须在打开 Set-UID 位之前完成,因为所有权更改将导致关闭 Set-UID 位
使用-fno-stack-protected 和“-z Execstack”选项关闭 StackGuard 和非可执行堆栈保护
1 | |
Task 2: Exploiting the Vulnerability
我们需要编写exploit.c,该代码可以填写badfile的内容从而引发攻击。为了发起攻击,我们需要使用gdb调试stack文件
编译stack.c:
在上面编译选项的基础上加上-g选项,编译stack.c,也即是
gcc -g -o stack -z execstack -fno-stack-protector stack.c,这里可以使用-DBUF_SIZE=N选项手动指定缓冲区的大小将stack更改为root所有的setuid文件
使用gdb去调试stack文件:
- b bof,在bof下断点
- x/16xw buffer观察buffer地址以及其内容
- p $ebp打印出栈指针的值
- $ebp+4就是返回地址
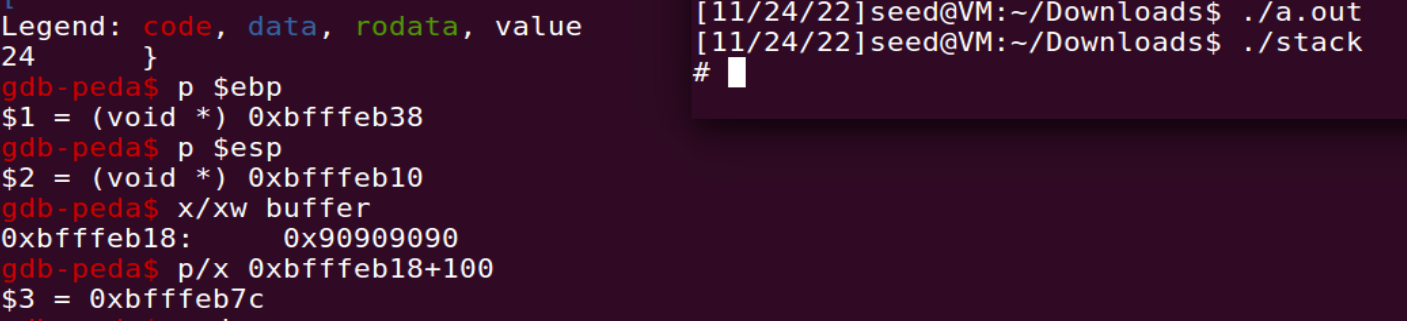
通过gdb调试发现:
- buffer地址为:0xbfffeb18
- ebp地址为:0xbfffeb38
p/d $ebp-0xffffcf84=32,也即是说,ebp在buffer上面32字节的位置- 返回地址为buffer上面36字节的位置
exploit.c:
1 | |
- 构造buffer,将原本的返回地址覆盖为0xbf ff eb 7c,注意这里是小端序,因此使用
memcpy(buffer+36,"\x7c\xeb\xff\xbf",4); - 0xbf ff eb 7c是buffer+100的地址,因此shellcode需要从buffer+100起始
stack.c:
1 | |
- bof函数
strcpy(buffer, str);语句存在缓冲区溢出漏洞 - str存储badfile中的内容,使用exploit生成恶意内容
Task 3: Defeating dash’s Countermeasure
dash有一个防御机制,当发现euid和真实id不一样的时候,就会放弃特权
因此攻击setuid程序的时候,一般我们会手动将/bin/sh指向别的shell。比如zsh,而这个任务要求我们在dash的情况下得到root shell
思路:
- 在Task2的shellcode最开头加上setuid(0)对应的二进制代码
首先将sh指向dash
1 | |
1 | |
将上面的代码加到shellcode之后,重新编译exploit.c,运行exploit,可以得到#,但是如果不加上面代码,则只能得到$,与预计相符合
Task 4: Defeating Address Randomization
ASLR:
- 在32位 Linux 机器上,堆栈只有19位的熵
- 这意味着堆栈基地址可以有219 = 524,288种可能性
打开地址随机化:
1 | |
使用以下 shell 脚本在无限循环中运行易受攻击的程序。如果攻击成功,脚本将停止; 否则,脚本将继续运行
- 本质上这个脚本其实就是不断的运行stack,核心代码只有./stack这一句
- 别的代码都是计时用的
- 命名为attach.sh,然后chmod +x 赋予执行权限,./attack运行脚本
1 | |
最红花了一分多钟就遍历得到了root shell
1 | |
Task 5: Turn on the StackGuard Protection
Stack Guard 使用 Canaries 检验堆栈是否被修改或者覆盖
假设打开Stack Guard,会abort错误
1 | |
Task 6: Turn on the Non-executable Stack Protection
打开堆栈不可执行保护
1 | |
出现段错误